Гораздо раньше, чем я приобрёл старую версию Raspberry Pi, я купил небольшую плату на базе Arduino Uno. Поигравшись в электронику и схемотехнику, я отложил микроконтроллер на долгое время, не найдя ему практического применения. Ещё тогда я собрал на его основе контроллер, управляющий музыкальным софтом с помощью MIDI, но дальше 4 потенциометров дело не дошло.
![]()
И вот я снова нашёл его. На этот раз я решил, что ему нужно найти практическое применение. Между системой умного сада с автополивом растений и миди-контроллером я остановился на втором, потому же полив растений - процесс медитативный, а на настоящий контроллер я не потрачусь.
Пораскинув гуглом, обнаружил большое множество готовых проектов, с туториалами и без, нашёл даже проект, где продают уже готовый набор с готовой печатной платой, куда останется лишь вставить все детали из комплекта (там же есть собранный контроллер, и тут есть только одна разумная причина для покупки - это гораздо дешевле аналогов). Я решил, что хочу делать всё самостоятельно, но не брать за основу хорошие проекты было бы глупо. К сожалению, единственное, что сработало для меня в должной мере, это всё тот же старый гайд, по которому я собрал контроллер несколько лет назад.
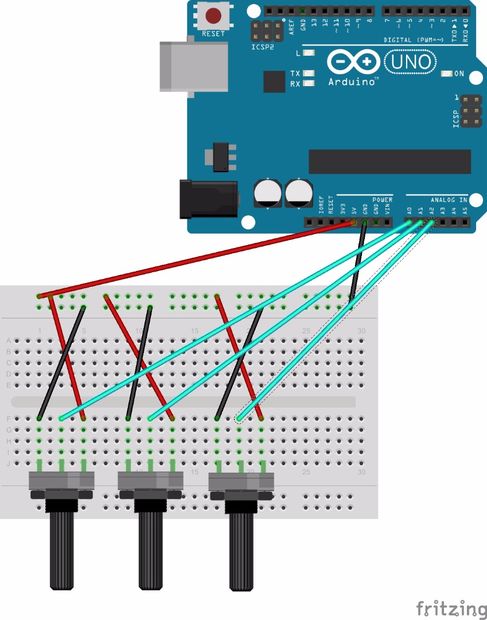
Схема простая:

На плату загружается код (он есть в статье по ссылке, но на всякий случай я сохраню его здесь):
int val = 0; //Our initial pot values. We need one for the first value and a second to test if there has been a change made. This needs to be done for all 3 pots.
int lastVal = 0;
int val2 = 0;
int lastVal2 = 0;
int val3 = 0;
int lastVal3 = 0;

void setup()
{
   Serial.begin(9600);       // Set the speed of the midi port to the same as we will be using in the Hairless Midi software
}

void loop()
{
   val = analogRead(0)/8;   // Divide by 8 to get range of 0-127 for midi
   if (val != lastVal) // If the value does not = the last value the following command is made. This is because the pot has been turned. Otherwise the pot remains the same and no midi message is output.
   {
   MIDImessage(176,1,val);}         // 176 = CC command (channel 1 control change), 1 = Which Control, val = value read from Potentionmeter 1 NOTE THIS SAYS VAL not VA1 (lowercase of course)
   lastVal = val;

   val2 = analogRead(1)/8;   // Divide by 8 to get range of 0-127 for midi
   if (val2 != lastVal2)
   {
   MIDImessage(176,2,val2);}         // 176 = CC command, 2 = Which Control, val = value read from Potentionmeter 2
   lastVal2 = val2;

   val3 = analogRead(2)/8;   // Divide by 8 to get range of 0-127 for midi
   if (val3 != lastVal3)
   {
   MIDImessage(176,3,val3);}         // 176 = CC command, 3 = Which Control, val = value read from Potentionmeter 3
   lastVal3 = val3;
delay(10); //here we add a short delay to help prevent slight fluctuations, knocks on the pots etc. Adding this helped to prevent my pots from jumpin up or down a value when slightly touched or knocked.
}

void MIDImessage(byte command, byte data1, byte data2) //pass values out through standard Midi Command
{
   Serial.write(command);
   Serial.write(data1);
   Serial.write(data2);
}
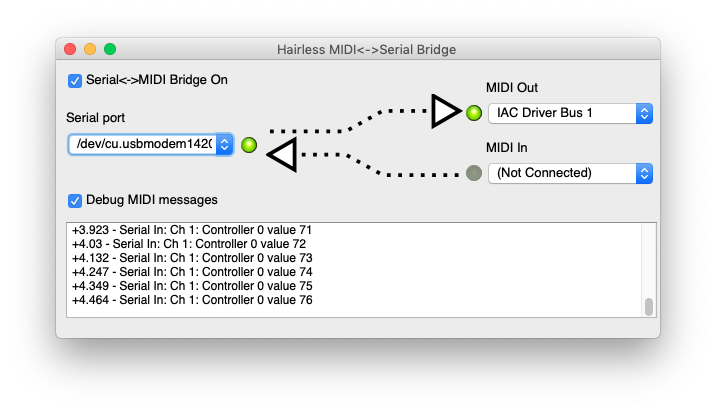
Суть работы простая: Arduino получает аналоговый сигнал (Analog), затем программа переносит его через последовательный порт (Serial), и так как в Arduino Uno нет встроенного MIDI, нам необходимо использовать софт для преобразования последовательного сигнала (Serial) в MIDI. Я рекомендую Hairless MIDI (Windows & MacOS). 
В ней сигнал преобразуется в MIDI, и уже в нужном нам DAW или диджейском софте мы можем мэппить (настраивать соответствие миди-сигнала определённому действию в программе) наши крутилки.
И, казалось бы, контроллер готов, но у него есть только потенциометры. Мне нужно больше. В поисках примеров, где используются и потенциометры, и кнопки, я нашёл много хороших проектов, но все они использовали сторонние библиотеки: MIDI.h или MIDI_controller.h. Это универсальные инструменты для сборки своего контроллера, там прописаны все возможные варианты, и, если я правильно понял, они позволяют пропустить посредника в виде Hairless MIDI. Но в их универсальности их проблема - они громоздкие, сложные, и настроить такую - всё равно что написать свою. Я хотел аккуратный код, который подходит моему проекту.
Не писав ничего на Си уже три года, я взял волю в кулак, и, потратив пару дней на изучение матчасти, написал код, подходящий мне. В нём я учитывал особенности своего проекта:
- Количество потенциометров и кнопок динамическое - можно настроить в коде
- Переключатель, перебрасывающий один сенсор между двумя разными значениями, чтобы увеличить возможное количество миди-команд в два раза
- Рядом с переключателем - светодиод-индикатор
Проект на GitHub
Код и схема с двумя потенциометрами и тремя кнопками (зелёная в качестве переключателя, другие две - в качестве миди-нот) ниже.
![]()
На всякий случай код:
/* Arduino MIDI Controller

Created by Viktor G. / https://viktorgordienko.com

This code is in the public domain.

You can: copy it, modify it, share it, buy it, use it, break it, fix it, trash it, change it, mail - upgrade it, etc.

*/

//Potentiometers
int numberOfPots = 2;     //Total number of potentiometers
int potValues[2];         //Array of current values
int potLastValues[2];     //Array of last values (used to compare)

//Buttons
int numberOfButtons = 2;  //Total number of buttons EXCEPT the switch button
int buttonsStates[2];     // the current state of the output pin
int buttonReadings[2];    // the current reading from the input pin
int buttonPrevious[2];    // the previous reading from the input pin
long time = 0;            // the last time the output pin was toggled
long debounce = 200;      // the debounce time, increase if the output flickers
// the last 2 are long’s because the time, measured in msec, will quickly become a bigger number than can be stored in an int.

//Switch button
int controlSwitch = 0;    //used to add another set of controls
int switchState = LOW;
int switchReading;
int switchPrevious = HIGH;

void setup() {
  for (int i = 0; i <= numberOfButtons; i++) {
    pinMode(i + 8, INPUT_PULLUP); //+8 because I started on D8
  }
  pinMode(13, OUTPUT);
  Serial.begin(9600); //Set the speed of the midi port to the same as we will be using in the Hairless Midi software
}

void loop()
{
  //Potentiometesrs on А0-A(numberOfPots-1)
  for (int i = 0; i < numberOfPots; i++) {
    potValues[i] = analogRead(i) / 8;                     // Divide by 8 to get range of 0-127 for MIDI
    if (potValues[i] != potLastValues[i])                 //If the value does not = the last value the following command is made. This is because the pot has been turned. Otherwise the pot remains the same and no midi message is output.
    {
      MIDImessage(176, i + controlSwitch, potValues[i]);  //176 = CC command (channel i control change), (i + controlSwitch) = Which Control, val = value read from Potentionmeter 1
    }
    potLastValues[i] = potValues[i];
  }
  //Potentiometesrs on А0-A(numberOfPots-1)

  //Buttons on D8-D9
  for (int i = 0; i < numberOfButtons; i++) {
    buttonReadings[i] = digitalRead(i + 8);
    if (buttonReadings[i] == HIGH && buttonPrevious[i] == LOW && millis() - time > debounce) {
      if (buttonsStates[i] == HIGH) {
        buttonsStates[i] = LOW;
        MIDImessage(144, i + controlSwitch, 127);         //144 - Note ON, (i + controlSwitch) - note number in MIDI [e.g. 69 = A4], 127 - note velocity
      } else {
        buttonsStates[i] = HIGH;
        MIDImessage(144, i + controlSwitch, 127);
        time = millis();
      }
    }
    buttonPrevious[i] = buttonReadings[i];
  }
  //Buttons on D8-D9

  //The control switch button on D10 and LED on D13
  switchReading = digitalRead(10);
  if (switchReading == HIGH && switchPrevious == LOW && millis() - time > debounce) {
    if (switchState == HIGH) {
      switchState = LOW;
      controlSwitch = 0;
    } else {
      switchState = HIGH;
      controlSwitch = 64;
    }
  }
  digitalWrite(13, switchState);
  switchPrevious = switchReading;
  //The control switch button on D10 and LED on D13

  delay(10); //here we add a short delay to help prevent slight fluctuations, knocks on the pots etc. Adding this helped to prevent my pots from jumpin up or down a value when slightly touched or knocked.
}

void MIDImessage(byte message, byte control, byte value)  //Pass values out through standard Midi Command
{
  Serial.write(message);
  Serial.write(control);
  Serial.write(value);
}
Получился примитивный гранулярный синтезатор с ограниченными возможностями по извлечению звука. Тем не менее, это хороший пример того, как сложна электронная музыка под капотом.
Полезные ссылки
- First project that worked for me
- This one has buttons and fader, didn’t work for me yet
- Made the CC work, had troubles with button, asked a question
- Got the hint at the forum: Pull Up Resistor
- This is a switch example I used to make the button work as I needed
- Check out the Teensy board (build-in USB-MIDI support